blockquote{border-left:4px solid #3b82f6;margin:1.5em 0;padding:1em 1.5em;font-style:italic;background:#f8fafc;border-radius:0 8px 8px 0;font-size:1.1em;color:#1e293b} .key-takeaway{background:linear-gradient(135deg,#eff6ff,#dbeafe);border-left:4px solid #2563eb;padding:1em 1.5em;margin:1.5em 0;border-radius:0 8px 8px 0} .key-takeaway strong{color:#1e40af} .stat-highlight{text-align:center;padding:1.5em;margin:1.5
blockquote{border-left:4px solid #3b82f6;margin:1.5em 0;padding:1em 1.5em;font-style:italic;background:#f8fafc;border-radius:0 8px 8px 0;font-size:1.1em;color:#1e293b}
.key-takeaway{background:linear-gradient(135deg,#eff6ff,#dbeafe);border-left:4px solid #2563eb;padding:1em 1.5em;margin:1.5em 0;border-radius:0 8px 8px 0}
.key-takeaway strong{color:#1e40af}
.stat-highlight{text-align:center;padding:1.5em;margin:1.5em 0;background:#f0fdf4;border-radius:12px;border:1px solid #bbf7d0}
.stat-highlight .stat-number{display:block;font-size:2.5em;font-weight:800;color:#16a34a;line-height:1.2}
.stat-highlight .stat-label{display:block;font-size:.95em;color:#374151;margin-top:.3em}
.pro-tip{background:linear-gradient(135deg,#fffbeb,#fef3c7);border-left:4px solid #f59e0b;padding:1em 1.5em;margin:1.5em 0;border-radius:0 8px 8px 0}
.pro-tip strong{color:#92400e}
Security gates can stop a breach before it starts. Yet many projects stall because the design isn’t right. This guide walks you through every stage of custom security gate design , from site assessment to final hand-over. You’ll see how to pick the best material, embed safety devices, and keep the build on time and on budget.
We’ll also point out where most checklists fall short and show how LS Fencing’s proven process avoids those gaps.
Here’s the quick hook: An examination of seven custom security gate design elements from a single Australian source uncovers a surprising omission , none of the checklist items name a specific compliance standard, even though they are marketed as safety-compliant solutions.
| Design Element | Recommended Specification | Best For | Source |
|---|---|---|---|
| Compliant gate design & engineering | Custom gate designs that consider site constraints, usage frequency, wind loads, clearances and applicable Australian Standards from the planning stage. | Best for structural planning | latitudefencing.com.au |
| Automated gate systems & motor selection | Supply and installation of correctly sized, certified automation systems suited to residential, commercial and industrial applications. | Best for automation sizing | latitudefencing.com.au |
| Integrated safety devices | Installation of photo beams, safety edges, obstacle detection and force limitation settings to minimise crushing, impact and entrapment risks. | Best for safety devices | latitudefencing.com.au |
| Access control integration | Smooth integration of intercoms, keypads, swipe cards, remote access and induction loops for controlled and compliant entry management. | Best for access control | latitudefencing.com.au |
| Commercial & industrial compliance support | Gate solutions designed to suit high-traffic sites, mixed pedestrian-vehicle access and WHS risk management requirements. | Best for high-traffic compliance | latitudefencing.com.au |
| Testing, commissioning & compliance checks | Thorough testing of gate movement, safety systems and emergency releases before handover. | Best for commissioning | latitudefencing.com.au |
| Documentation & handover support | Provision of operation manuals, compliance information and user guidance to support builder obligations at practical completion. | Best for documentation | latitudefencing.com.au |
Step 1: Assess Site Requirements
Before you draw a line on paper, you need a clear picture of the site. Start by walking the perimeter. Measure the opening width, note any slope, and record the surrounding structures. Take photos from each angle , they become reference points later.
Next, list the usage patterns. Is the gate for heavy trucks, light delivery vans, or pedestrian traffic? Frequency matters because a gate that opens 200 times a day needs a sturdier motor than one that opens twice.
Now check the local codes. In NSW, the relevant standards include AS/NZS 1905.1 for fences and AS 2890 for gates. Even though the research table showed no specific standards, you must still reference them in your design docs.
Wind load is another hidden factor. For coastal sites, design for gusts of up to 120 km/h. That may mean a heavier frame or extra bracing.
Finally, map out utility lines. A gate that swings into an underground power cable can cause costly delays.
When you’ve gathered all this data, compile it into a simple spreadsheet. Columns for width, height, wind zone, traffic type, and any constraints keep the information tidy.
Bottom line: Know the site inside out before you start any drawing.
Step 2: Draft Preliminary Design Sketches
With the site data in hand, you can start sketching. Begin with a rough hand-drawn layout: outline the gate leaf, indicate hinges, and show the motor location. This helps you spot obvious clashes early.
Then move to CAD. The ASSA ABLOY Speedgate SG600 CAD files give you precise dimensions and material layers. Import those files into your favourite CAD program and adjust the width, height, and panel pattern to match the site survey.
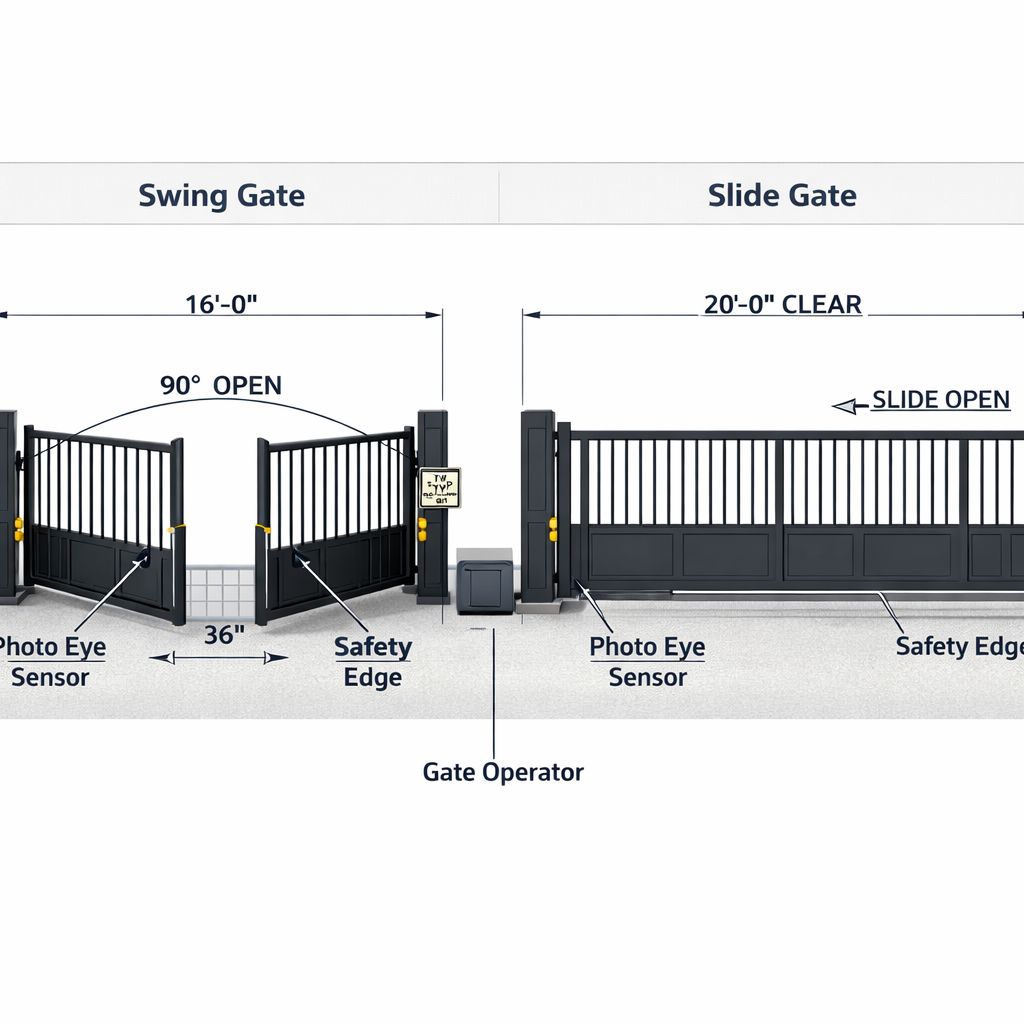
Use the CAD model to test different opening mechanisms , swing, slide, or barrier arm. Each has its own space needs. A swing gate needs clear swing radius; a sliding gate needs a clear track.
Don’t forget safety devices. Add photo-beams and obstacle sensors in the model so you can see where they’ll sit once the gate is built.

When the CAD model looks good, export a 2-D plan for the construction team and a 3-D view for the client. The visual helps non-technical stakeholders approve the design faster.
Export the drawings as PDFs and store them in a shared folder. Everyone from the architect to the fabricator can comment directly on the files.
At this point, you may want to ask a senior engineer to review the loads. Their sign-off is a key step before moving to final specs.
Bottom line: Sketches, especially CAD, give you a concrete base for engineering.
Deep Dive: Material Selection Guide
Material choice drives cost, maintenance, and lifespan. Below is a quick side-by-side view of the most common options, taken from a real-world guide.
| Material | Durability | Maintenance | Design Flexibility |
|---|---|---|---|
| Wrought Iron | Very High | Moderate | High |
| Steel | Very High | Moderate | Moderate |
| Aluminum | Medium | Low | Moderate |
| Wood | Medium | High | High |
| Composite | High | Low | Moderate to High |
For high-security sites, steel or wrought iron are the go-to choices. Their strength resists forced entry, and a hot-dip galvanised finish adds corrosion protection , a standard LS Fencing practice.
If the project sits in a dry, sunny climate, aluminum offers low upkeep and won’t rust. It’s lighter, so the motor can be smaller, which saves energy.
Wood gives a natural look but needs regular sealing. It can warp in humid conditions , not ideal for a commercial gate that must stay level.
Composite blends wood fibers with plastics. It resists rot and needs little upkeep, making it a solid middle-ground for sites that want a warm look without high maintenance.
When you decide, ask the fabricator for material certificates. They should show the steel grade (e.g., ASTM A36) and any galvanisation specs.
Bottom line: Choose a material that balances durability, upkeep, and design goals.
Step 3: Finalize Design with Engineering Specs
Now the rough sketches become a full set of engineering documents. Start with a structural analysis. Use the site wind data and gate dimensions to calculate bending moments on the frame.
Load calculations feed into the selection of hinges, rollers, and motor size. A 2-ton gate needs a motor rated for at least 2.5 kW to cover start-up surges.
Next, draft the electrical diagram. Include the motor controller, safety sensors, and access control wiring. Follow AS 3000 for electrical safety.
Don’t forget the safety edge settings. The force limit should not exceed 200 N for pedestrian gates, as per Australian WHS guidance.
Once the specs are ready, bundle them into a design package: CAD drawings, load tables, material certificates, and a compliance checklist. LS Fencing’s in-house engineers review the package and sign off.
Submit the package to the local council if a permit is needed. The council will look for compliance with AS/NZS 1905.1 and any height restrictions.
“The best time to start building backlinks was yesterday.”
Bottom line: Detailed specs turn sketches into build-ready documents.
Deep Dive: Integrate Access Control Systems
Access control is the brain of a modern gate. It decides who gets in and who stays out. The first decision is the credential type , keypad PINs, RFID cards, or mobile app credentials.
Keypad systems are cheap and easy, but they share a single code. For a large campus, LS Fencing recommends unique PINs per user to keep audit trails clean.
RFID cards and fobs add security and can be managed centrally. They also integrate well with existing door-access systems, letting you run one software platform for all entry points.
Mobile credentials are gaining traction. A smartphone app talks to the gate via Bluetooth or NFC, removing the need for physical cards.

Whichever method you pick, you’ll need a controller. The controller receives the credential data, checks it against a database, and sends a signal to the motor. Make sure the controller supports fail-safe operation , if power is lost, the gate should default to the open position for emergency egress.
Don’t forget audit logs. A good system records every entry attempt, successful or not. That data helps security teams spot patterns and respond quickly.
Bottom line: Pick credentials, a reliable controller, and strong logging for a secure gate.
Step 4: Fabrication and Installation Process
Fabrication turns drawings into steel, aluminum, or composite panels. LS Fencing’s workshop follows a strict quality flow: cut, weld, grind, then coat.
First, the raw metal is cut to size using CNC plasma. This ensures each piece matches the CAD dimensions to the millimeter.
Next comes welding. For steel gates, we use MIG welding with a filler that matches the base metal’s tensile strength. Welds are inspected visually and with non-destructive testing (NDT) to catch hidden cracks.
After welding, the gate is sandblasted to remove rust and scale. Then a hot-dip galvanised coating is applied , a core LS Fencing service that extends life in salty coastal air.
Finally, a powder-coat in the client’s colour is baked on. Powder coating adds a uniform finish and resists chipping.
Installation begins with foundation work. Posts are set at least 1 m deep in concrete, with a minimum ground clearance of 50 mm. The gate frame is then bolted to the posts using high-grade fasteners.
Motor mounting follows. The motor must be aligned with the gate’s swing axis or slide track to avoid strain. Use a torque wrench to tighten bolts to the manufacturer’s spec.
After the gate is in place, hook up the electrical wiring. Run conduit from the controller to the motor, and connect safety sensors. Run a final test of the opening sequence, safety edge activation, and access control response.
Bottom line: Follow a step-by-step build plan to deliver a reliable, compliant gate.
Conclusion
Designing a custom security gate is a multi-discipline effort. It starts with a thorough site survey, moves through precise CAD sketches, and ends with a vetted engineering package that feeds a high-quality fabrication line. Selecting the right material, adding smart access control, and following a disciplined install routine ensure the gate meets safety, durability, and compliance goals.
LS Fencing’s end-to-end service covers every step , from design to hand-over , giving commercial developers, government agencies, and facilities managers a single trusted partner. With a proven track record on tier-1 projects, LS Fencing can keep your timeline tight and your risk low.
Take the next step now. Contact LS Fencing for a free design consultation and see how a custom security gate design can protect your assets while fitting your aesthetic.
FAQ
What is the first thing I should do before starting a custom security gate design?
You should conduct a full site assessment. Measure opening dimensions, note terrain slope, record wind zone, and map utility lines. This data feeds every later decision, from material choice to motor size, and helps you stay compliant with Australian Standards for fences and gates.
How do I choose the right material for a high-security gate?
Pick a material that matches the threat level and climate. Steel or wrought iron give the highest strength and can be hot-dip galvanized for corrosion protection. For lighter loads or a modern look, aluminum works well but may need a larger motor. LS Fencing can advise on the best finish for your site.
Can I integrate RFID access control with my custom gate?
Yes. RFID cards or fobs can be read by a controller that talks to the gate motor. The controller logs each entry, checks credentials against a database, and can trigger alerts for rejected attempts. LS Fencing’s solutions include cloud-based monitoring for easy admin.
What safety devices are required on a commercial gate?
Australian regulations recommend photo-beams, safety edges, and force-limit settings. These devices stop the gate if an obstacle is detected and limit crushing force to under 200 N for pedestrian gates. LS Fencing installs and calibrates these systems as part of the build.
How long does the fabrication process usually take?
From final CAD approval to finished gate, a typical timeline is 4-6 weeks. Cutting, welding, sandblasting, galvanising, and powder-coating each have set lead times. LS Fencing coordinates with fabricators to keep the schedule tight and provides progress updates.
Do I need a permit to install a security gate?
Most Australian councils require a permit if the gate exceeds 2 m in height or impacts a public right-of-way. Your design package should include a compliance checklist referencing AS/NZS 1905.1 and local zoning rules. LS Fencing can help compile the paperwork for council approval.
What maintenance does a custom security gate need?
Regular checks keep the gate safe and functional. Lubricate hinges and rollers quarterly, inspect safety sensors monthly, and clean the powder-coat surface to prevent debris buildup. LS Fencing offers a maintenance contract that schedules inspections and part replacements.
How can I ensure the gate stays operational during power outages?
Install a backup power source such as a UPS or solar-charged battery. The controller should auto-switch to the backup and keep the gate operational for at least 30 minutes. LS Fencing can design the electrical system to include surge protection and redundant power.
Specifying or pricing a perimeter?
Send the drawings or a brief and LS Fencing Services will come back with a detailed proposal.